How to Make a Cute Crochet Christmas Mouse Ornament
There is something especially charming about handmade Christmas decorations. Instead of reaching for another mass-produced ornament, you can create something with personality, texture, and a little bit of your own creativity.
This adorable crochet Christmas mouse is a lovely example.
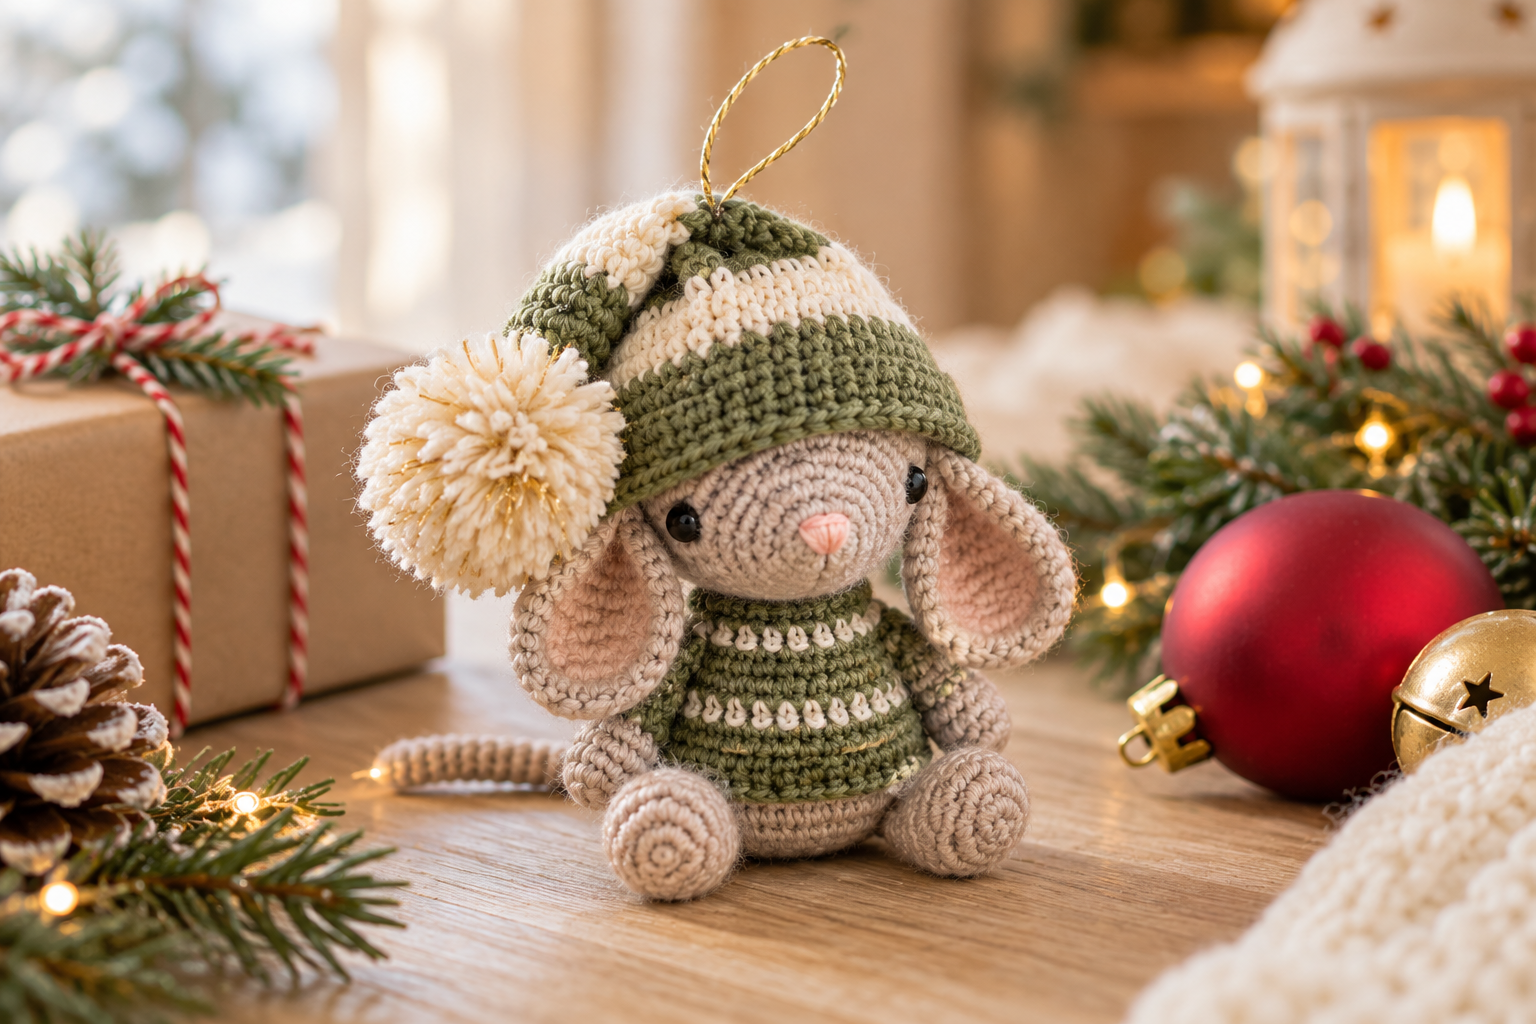
The original project is a small amigurumi mouse designed as a festive Christmas decoration. It has a soft taupe body, a green-and-cream holiday hat, a tiny pink nose, floppy ears, and a hanging loop that allows the finished mouse to become a Christmas-tree ornament.
The source pattern describes the finished character as approximately 12 cm (4.75 inches) tall and rates the project as beginner level.
For this Crochetya article, we’ll focus on the construction, techniques, finishing ideas, and visual details that make this project work so well as a Christmas decoration rather than reproducing the original pattern instructions.

Why You’ll Love This Crochet Christmas Mouse
Small amigurumi projects are wonderful for holiday crafting because they don’t require a huge amount of space or materials.
A project like this can be used in several ways:
- As a Christmas-tree ornament
- As part of a handmade holiday display
- As a small seasonal gift
- As a decoration for a gift package
- As a cute addition to a winter-themed crochet collection
The original design also includes a gold hanging string through the top of the hat, making its purpose as a tree decoration particularly clear.
Another advantage is that the finished character is relatively small. At approximately 12 cm tall, it has enough detail to look expressive without becoming a large, time-consuming amigurumi.
What You’ll Need
Yarn
The source uses four main color families:
- Taupe for the mouse
- Green for the Christmas clothing
- Off-white for the decorative sections
- Pink for the nose and inner-ear details
Gold yarn is also used for the festive pom-pom and hanging detail.
You don’t necessarily have to reproduce the exact color palette when creating your own holiday mouse. The same concept could work beautifully with traditional red and white, burgundy and cream, forest green and beige, or even a more modern pastel Christmas palette.
Crochet Hook and Basic Tools
The source specifies a 2.5 mm crochet hook for the yarn used in its example, along with stitch markers and needles for sewing and embroidery.
You’ll also need stuffing, safety eyes, embroidery thread, and a pom-pom maker if you want to recreate the decorative hat detail shown in the source.
Understanding the Construction
One of the nicest things about this project is the way several small crocheted components come together to create the finished character.
Rather than crocheting the entire mouse as one continuous piece, the project is constructed from separate sections.
The head and body form the central shape. The arms, legs, ears, and tail are then attached afterward. Finally, the Christmas hat is added to complete the festive look.
This type of construction is common in amigurumi because separate pieces make it easier to shape each feature and position it precisely.
Step 1: Create the Mouse’s Head
The head is worked from the nose area outward, gradually increasing until the main rounded shape is established.
The source uses single crochet for the head and begins with a magic ring. The shaping gradually increases the stitch count before continuing through several rounds at the widest part.
This is an important stage because the head determines much of the character’s expression.
The safety eyes are positioned after the main head shape has been established. The source specifies 5 mm safety eyes and uses marked stitches to help center them.
A small pink embroidered nose completes the face.
When working on an amigurumi face, take a moment to check the positioning before permanently securing the features. Even a small adjustment can change the personality of the finished mouse.
Stuffing the Head
The head should be filled with fiberfill while the crocheted shape is being completed.
The source specifically calls for firm stuffing and continuing to add stuffing as the remaining rounds are crocheted.
Aim for a smooth, rounded shape rather than packing the stuffing so tightly that the crochet stitches become stretched.
Step 2: Crochet the Body
The body begins from the bottom and is shaped with gradual increases before narrowing toward the upper section.
The source combines taupe, green, and off-white yarn to create the Christmas-inspired clothing effect. There is also an optional decorative use of off-white stitches within one of the green sections.
This color arrangement gives the little mouse a festive appearance without requiring complicated surface embroidery.
Once the body is completed, it is stuffed firmly and prepared for attachment to the head.
Step 3: Make the Arms
Two matching arms are created separately.
The hands begin in the mouse’s taupe color before transitioning into green, creating the impression of a small festive outfit.
The source recommends firmer stuffing in the hand area and gradually less stuffing farther up the arm. The top opening is then flattened and closed before the arm is sewn to the body.
This gradual approach to stuffing helps the arms remain soft and flexible while maintaining enough shape.
Step 4: Shape the Legs
The two legs begin with pink yarn and transition into taupe.
They are shaped with increases around the lower portion before becoming narrower toward the top. Like the arms, the legs are stuffed more firmly near the foot and less densely farther up.
When preparing the legs for assembly, keep both pieces as similar as possible in size and shape.
Small differences can become noticeable once the mouse is standing or sitting.
Step 5: Add the Ears
The ears are particularly cute because each one is constructed from two layers.
The project uses pink for the inner ear and taupe for the outer ear. Both pieces are crocheted separately and then joined together before the ear is folded and prepared for sewing.
This layered construction gives the ears more visual depth than a single flat crocheted piece.
It also creates a nice opportunity to experiment with color. If you want a different holiday style, the inner ear could be made in a muted rose, cream, or another soft contrasting color.
Step 6: Make the Tail
The tail is a narrow crocheted tube worked in taupe.
Unlike the body, the source specifically says that the tail should not be stuffed. Instead, its opening is flattened and closed before the tail is attached to the back of the body.
Keeping the tail unstuffed allows it to remain slender and flexible.
Step 7: Crochet the Christmas Hat
The hat is what really gives this little mouse its Christmas personality.
It begins in green and uses half double crochet for much of its shaping. Off-white and green sections are alternated to create the striped appearance shown in the original project.
Once the hat reaches its final size, the top is decorated with a fluffy pom-pom made using off-white and gold yarn.
The source uses a 35 mm pom-pom maker for this detail. The pom-pom is then sewn securely to the tip of the hat.
The hat is also shaped by sewing its tip down, creating the charming bent appearance visible in the finished project.
Step 8: Assemble Your Mouse
This is where all the individual pieces finally become one character.
The source’s assembly sequence is:
- Attach the body to the head.
- Sew the arms to the body.
- Attach the legs.
- Sew the ears to the head.
- Attach the tail to the back.
- Position and sew the Christmas hat.
- Add the gold hanging loop.
The original assembly illustrations on page 9 show the recommended positioning of these parts and are useful visual references when working from the original pattern.
A Small Positioning Tip
Before sewing each part permanently, use pins or temporary yarn markers to check the placement.
This is especially useful for:
- Ears
- Arms
- Legs
- Tail
- Hat
The source even notes that the head can be tilted slightly to create a cuter expression.
Step 9: Add the Hanging Loop
To turn the finished mouse into a Christmas ornament, thread a piece of gold string through the top of the hat.
This small detail makes the finished amigurumi much more versatile. It can hang directly from a Christmas tree branch or become part of a larger handmade holiday display.
Helpful Tips for a Neat Amigurumi Finish
Keep your tension consistent
Consistent tension helps the stuffed pieces maintain their intended shapes.
Don’t overstuff
Too much stuffing can stretch the stitches and make the fabric look uneven.
Check symmetry
Compare the arms, legs, and ears before sewing them into place.
Position the face carefully
Eyes and the embroidered nose have a major influence on the expression.
Take your time with assembly
The final sewing stage can make the difference between a basic amigurumi and a polished finished character.
Christmas Color Ideas
Although the source uses taupe, green, off-white, pink, and gold, the concept can be adapted to many palettes.
Try:
Traditional Christmas:
Red + cream + green + gold
Winter woodland:
Sage + beige + ivory + brown
Soft Christmas:
Dusty pink + cream + sage
Modern Christmas:
Forest green + warm white + metallic gold
The silhouette remains festive while the color choices allow the finished mouse to match your own Christmas decor.
Frequently Asked Questions
What size is the finished Christmas mouse?
The source states that the finished mouse is approximately 12 cm, or 4.75 inches, from the top of the hat to the base of the body.
What crochet hook size is specified?
The source specifies a 2.5 mm crochet hook for the yarn used in the example.
What type of crochet project is this?
It is a small amigurumi Christmas mouse designed as a festive decoration, including a hanging loop for use as an ornament.
Is this suitable for beginners?
The source labels the project as Beginner.
Does the mouse need stuffing?
Yes. Fiberfill/toy stuffing is listed among the required materials, and the head and body are specifically stuffed during construction. The source also provides different stuffing guidance for the arms and legs.
Does the tail need stuffing?
No. The source specifically instructs that the tail should remain unstuffed.
What makes the project look festive?
The green-and-off-white hat, fluffy pom-pom, gold details, and hanging loop give the mouse its Christmas character.
Can the colors be changed?
The source provides a specific color palette, but changing colors is a general crochet customization choice. The finished appearance will naturally vary according to the yarn colors selected.
Final Thoughts
A small handmade ornament can bring a surprising amount of personality to a Christmas tree.
This crochet mouse combines simple amigurumi construction with festive details such as a striped hat, fluffy pom-pom, embroidered nose, and gold hanging loop. The result is a charming seasonal decoration that can also make a thoughtful handmade gift.
If you enjoy small crochet projects, this type of amigurumi is a wonderful way to experiment with shaping, color changes, stuffing, embroidery, and assembly in one compact project.
Love handmade Christmas crochet? Explore more free crochet ideas and creative projects here on Crochetya, and come back soon for another cozy handmade project.