Small Crochet Pumpkin Pattern – 5 Easy Steps
A small crochet pumpkin is a simple project that works beautifully as an autumn home decoration. Its small size means it can be made relatively quickly, even if you are just starting your crochet journey. In this guide, you’ll find tips on choosing the right yarn and crochet hook, creating the basic shape, adding the stuffing evenly, and forming the characteristic pumpkin segments. The project can easily be customized with different colors and made in several sizes.

Small Crochet Pumpkin Pattern – An Autumn Decoration
A small crochet pumpkin is an easy way to add an autumn touch to your home. Because of its compact size, you can make several pumpkins in different colors and create a cohesive seasonal decoration.
Why Is a Small Crochet Pumpkin a Great Autumn Project?
The small size of this project means that you only need a small amount of yarn, making it a great way to use up leftover skeins. The pumpkin does not require much working space, and its characteristic shape can be created using simple crochet techniques.
The approximate finished dimensions can be as follows:
| Pumpkin Size | Height | Width |
|---|---|---|
| Mini | 5–6 cm | 6–7 cm |
| Small | 7–9 cm | 8–10 cm |
| Medium | 10–12 cm | 12–14 cm |
If you are a beginner, a version measuring approximately 8–10 cm wide is a comfortable choice. You can also make the project smaller or larger while maintaining the proportions throughout the different stages.
How Can You Use Crochet Pumpkins Around Your Home?
Finished pumpkins can be placed on a shelf, dresser, windowsill, or table. Several pumpkins in different sizes can create a more interesting arrangement than a single decoration. You can also combine them with other autumn decorations, such as leaves, pinecones, or natural decorative elements.
How Do You Choose the Right Pumpkin Size for Your Decoration?
It is a good idea to decide on the size before you start crocheting. Small pumpkins work well as individual accents or as part of a larger arrangement, while larger pumpkins can become the main decorative element.
When planning your project, pay attention not only to the number of rows but also to the yarn weight and crochet hook size. These two factors can significantly affect the final dimensions. After crocheting the first few rows, check the width of your project and adjust your yarn tension if necessary.
Materials Needed to Make a Crochet Pumpkin
To make a small crochet pumpkin, you only need a few basic materials. This project does not require a large amount of yarn or any specialized tools, so it is easy to prepare everything you need before getting started.
What Yarn Should You Use for a Crochet Pumpkin?
Medium-weight yarn works well for this type of decoration because it creates a firm and stable structure. Cotton or a cotton blend is particularly practical. You can also use leftover yarn from other projects as long as it has a suitable weight.
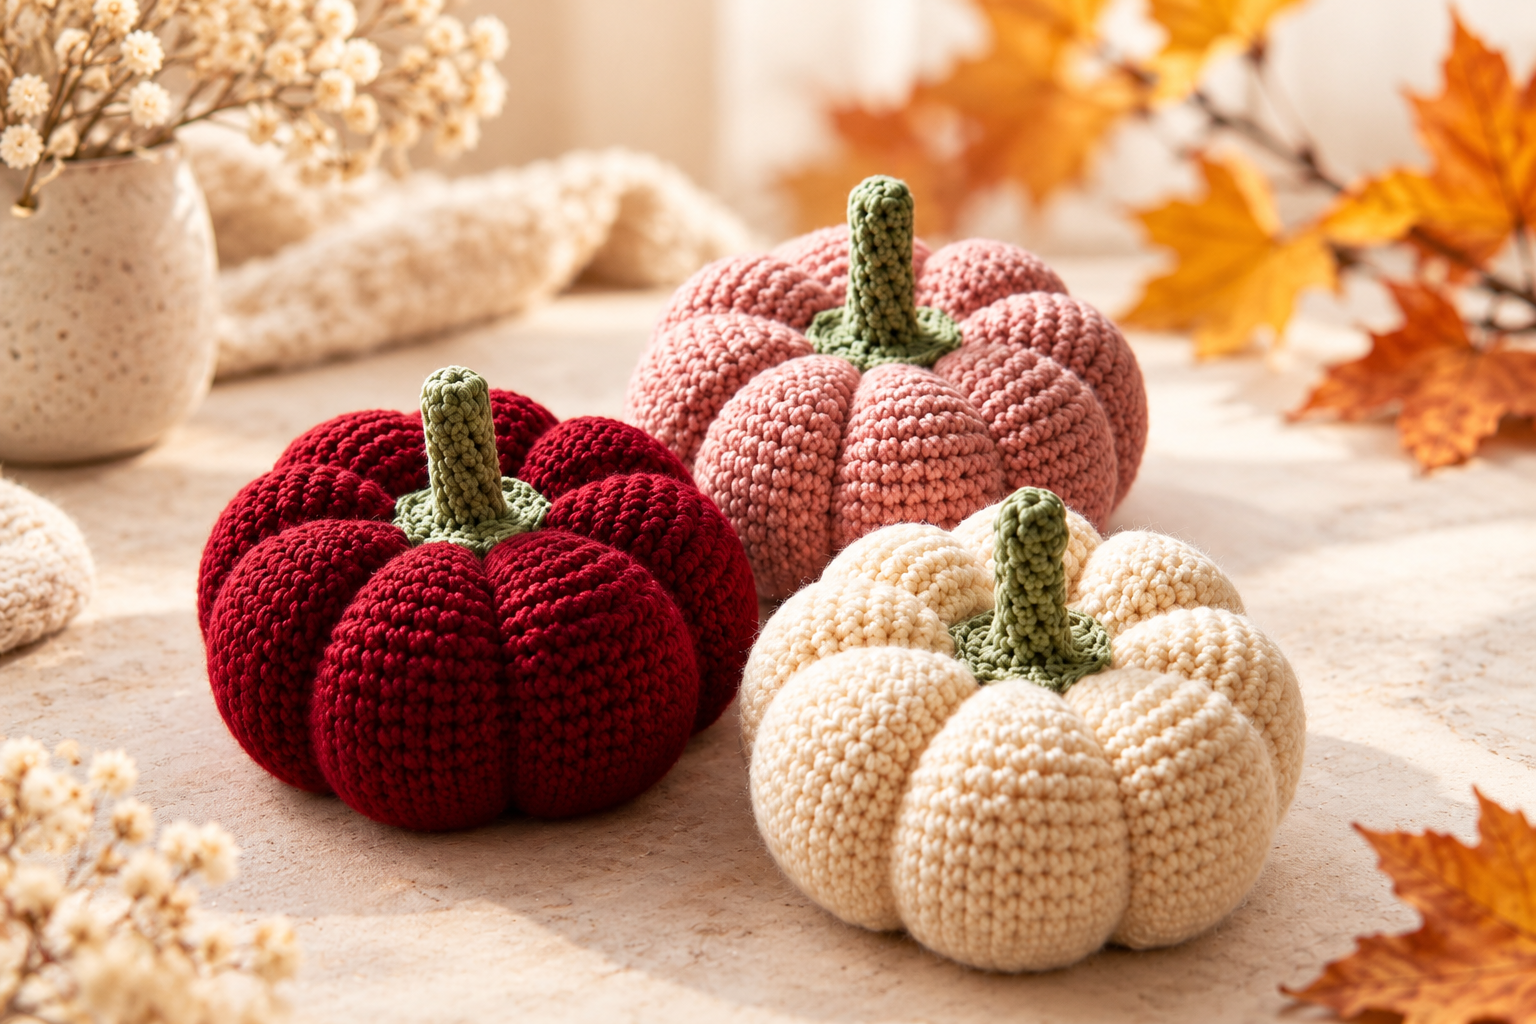
Orange is the most classic choice, but your pumpkin can also be cream, rust, brown, mustard, or green. If you are making several pumpkins, try combining different shades while keeping a similar yarn weight.
How Do You Choose the Right Crochet Hook Size?
The crochet hook size should generally be selected according to the information on the yarn label. However, when making a decorative pumpkin, it is important to pay attention to stitch tension. Stitches that are too loose may allow the stuffing to show through, while crocheting too tightly can make it difficult to shape the project.
Before making the entire pumpkin, you can crochet a few test stitches. This is a simple way to check whether the material has the right structure and whether your chosen hook works well with the yarn.
What Additional Materials Should You Prepare?
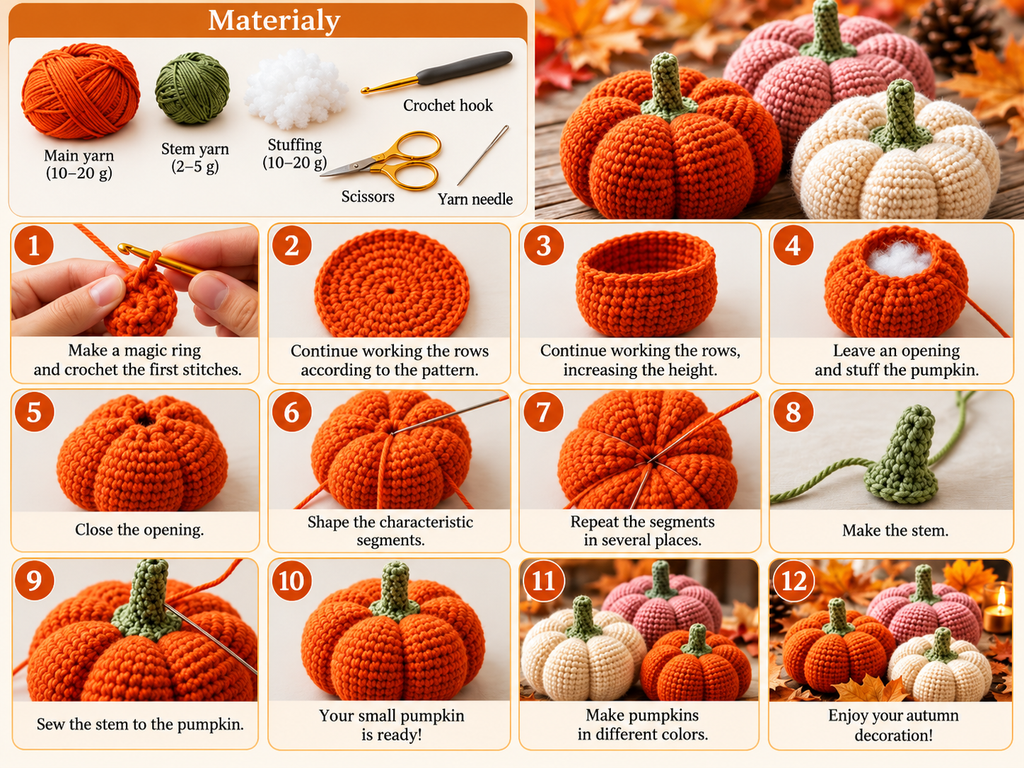
In addition to yarn and a crochet hook, prepare scissors, a large-eye needle, and soft stuffing. You will also need a small amount of green or brown yarn for the stem.
| Material | Approximate Amount |
|---|---|
| Main yarn | approximately 10–20 g |
| Stem yarn | approximately 2–5 g |
| Stuffing | approximately 10–20 g |
| Crochet hook | 1 |
| Yarn needle | 1 |
| Scissors | 1 |
The amount of stuffing you need depends on the size of the pumpkin and how firmly you want to shape it.

What Colors Work Best for an Autumn Pumpkin?
Orange is the most obvious choice, but you do not have to limit yourself to it. Warm rust, terracotta, caramel, and mustard shades work beautifully with the autumn theme. For the stem, you can use brown or green yarn.
If you plan to make several pumpkins, using a single color palette is a great idea. This way, even pumpkins in different sizes will look like a cohesive set.
How to Crochet a Small Pumpkin
Start by preparing all of your materials. For this project, the most important thing is to maintain a fairly tight stitch because the finished piece will later be stuffed. This helps prevent the stuffing from showing through the stitches and allows the pumpkin to maintain its shape.
How Do You Start a Simple Small Pumpkin Pattern?
Begin with a starting loop and work according to your chosen pattern. Make each stitch evenly while maintaining consistent yarn tension. The beginning of the project will form the foundation of the entire decoration, so it is important to keep your stitches regular.
When making a small pumpkin, it is helpful to monitor its width from the beginning. If the project starts becoming too wide or too narrow, it is much easier to correct the shape at the beginning than after the entire project has been completed.
How Do You Work the Following Rows of the Crochet Pumpkin?
Continue working the rows while maintaining similar yarn tension. Depending on your chosen pattern, you can gradually increase and then decrease the number of stitches. This change in width is what creates the rounded shape that resembles a pumpkin.
While working, check the shape of the project every few rows. It should not be completely flat or excessively elongated. Maintaining the correct proportions will make stuffing and shaping the decoration easier later.
How Do You Control the Size and Shape While Crocheting?
Regularly place your project on a flat surface and check its width and height. For a small version, you can aim for approximately 7–9 cm in height and 8–10 cm in width, although the final dimensions will depend on the type of yarn, crochet hook, and your stitch tension.
| Parameter | Approximate Range |
|---|---|
| Height | 7–9 cm |
| Width | 8–10 cm |
| Amount of yarn | 10–20 g |
| Recommended stuffing | 10–20 g |
If you want to make a larger pumpkin, you can continue working for several additional rows. The most important thing is to maintain the proportions so that the decoration remains wide and rounded.
How Do You Finish the Main Part of the Project?
Once the pumpkin reaches the desired size, do not close it completely right away. Leave an opening large enough to insert the stuffing. You can then move on to the next stage: evenly stuffing and shaping the characteristic pumpkin form.
Before closing the opening, check once again that the stitches are even and that there are no visible gaps in the surface. This will help the finished decoration look neat even after the stuffing has been added.
How Do You Give the Pumpkin Its Characteristic Shape?
After completing the main part of the project, it is time for the most important stage: giving the crochet pumpkin its rounded shape. At this point, the most important things are distributing the stuffing evenly and shaping the sides properly. Take your time, because small adjustments at this stage can make a significant difference to the finished decoration.
How Do You Stuff and Shape a Crochet Pumpkin?
Place small amounts of soft stuffing inside the pumpkin instead of adding a large amount all at once. Gradually distribute the material throughout the interior, paying particular attention to the sides and bottom of the pumpkin.
The pumpkin should be firm and springy, but not excessively hard. Overstuffing can stretch the stitches and change the proportions of the project. For a small pumpkin measuring approximately 7–9 cm high and 8–10 cm wide, start with a small amount of stuffing and gradually add more as needed.
How Do You Distribute the Stuffing Evenly?
After adding each portion of stuffing, gently shape the pumpkin with your fingers and check its form. If one side is more rounded than the other, move some of the stuffing toward the less-filled area.
| Problem | What to Do |
|---|---|
| The pumpkin is too soft | Add a small amount of stuffing |
| The surface is uneven | Distribute the stuffing with your fingers |
| The stitches are stretching too much | Remove some of the stuffing |
| The pumpkin is too flat | Add stuffing to the sides |
| The shape is asymmetrical | Move the stuffing before closing |
How Do You Create the Characteristic Pumpkin Segments?
After stuffing the pumpkin, you can create the characteristic indentations that resemble the natural segments of a pumpkin. For this, you will need a stronger piece of yarn or thread and a needle.
Pull the yarn through the center of the pumpkin and guide it along the sides, gently tightening it at selected points. Repeat the process at several evenly spaced intervals. Do not tighten the yarn too much, as the segments should be visible without distorting the overall shape of the decoration.
How Do You Secure and Finish the Pumpkin?
Once the shape looks right, close the opening and securely fasten the yarn end. You can then move on to making the stem.
At this stage, take another look at the pumpkin from every angle. If one segment is too shallow or one section appears larger than the others, you can gently adjust the tension before securing the yarn completely. This will help the small pumpkin maintain a regular, rounded shape.
Colors and Different Crochet Pumpkin Variations
A small crochet pumpkin does not always have to look the same. Changing the yarn color, size, or finishing technique allows you to create several different decorations based on a similar project. This is a great way to create a cohesive autumn arrangement without having to work complicated patterns.
How Can You Combine an Orange Pumpkin with Autumn Colors?
A classic orange pumpkin pairs beautifully with shades of brown, green, beige, rusty red, and mustard. You can make several similar pumpkins, with each one in a different color.
A good approach is to keep the same size and shape while changing the colors. This makes the decorations look like a thoughtfully designed set, even when each pumpkin has a different shade.
How Do You Make a Cream, Brown, or Green Pumpkin?
For a softer arrangement, choose cream or beige yarn. Brown and rust shades give the decoration a more natural appearance, while green can create an unusual and muted pumpkin variation.
You can also combine two shades in a single project. For example, make the main part cream and the stem brown. For a more decorative version, it is best to keep the shape simple so that the color remains the main feature of the project.
How Do You Create a Set of Pumpkins in Different Sizes?
A collection of pumpkins will be more interesting if they vary in height or width. You can start with a small model and then increase the number of rows to create larger versions.
| Variation | Approximate Height | Approximate Width |
|---|---|---|
| Mini | 5–6 cm | 6–7 cm |
| Small | 7–9 cm | 8–10 cm |
| Medium | 10–12 cm | 12–14 cm |
It is best to maintain similar proportions across all the models. This way, both small and large pumpkins will look great together on a shelf, table, or tray.
How Can You Decorate a Crochet Pumpkin Without Making the Project Complicated?
You do not need many extra details to change the appearance of a finished pumpkin. The simplest option is to make the stem in a contrasting color or add subtle segments that emphasize its shape.
You can also make several pumpkins in different colors instead of decorating each one individually. This approach keeps the project simple while still creating an eye-catching autumn arrangement.
Ideas for Using Small Crochet Pumpkins
Small crochet pumpkins can be used in many ways and do not have to be limited to just one type of decoration. Because they are small, they are easy to arrange into seasonal displays and adapt to different areas of your home.
How Can You Use Crochet Pumpkins as Table Decorations?
Several pumpkins arranged on a tray or directly on a table can create a simple autumn display. You can combine different sizes while keeping a similar color palette. Leave a little space between them so that each decoration remains clearly visible.
How Can You Decorate a Shelf, Dresser, or Windowsill with Them?
A group of several small pumpkins placed next to one another works beautifully on a shelf. You can place larger models toward the back and smaller ones in front to create a display with different heights.
On a windowsill or dresser, the pumpkins can be combined with other autumn decorations. Cream, brown, and orange shades are easy to coordinate with wooden elements and neutral decorations.
How Can You Combine Pumpkins with Other Autumn Decorations?
Crochet pumpkins pair beautifully with nature-inspired decorations. You can combine them with crocheted leaves, pinecones, dried botanical elements, or simple candle holders.
A good approach is to limit the number of colors to three or four. This keeps the arrangement cohesive without making it look too heavy.
Can a Small Crochet Pumpkin Be Used as a Handmade Gift?
Yes. Several small pumpkins can make a lovely little autumn gift set. You can make them in different colors but in a similar style, then package them together.
This project is also practical for crocheters because it does not require a large amount of material. You can use leftover yarn from previous projects and turn it into decorations that match the autumn color palette.
You can find more patterns and projects on my Facebook page and my Pinterest profile.
FAQ – Small Crochet Pumpkin Pattern
How Do You Crochet a Small Pumpkin?
To crochet a small pumpkin, prepare your yarn, an appropriate crochet hook, stuffing, a needle, and scissors. Start with the main part of the project and work the rows while controlling the width and height. Then leave an opening for the stuffing, fill the pumpkin with small amounts of material, and distribute it evenly inside. Finally, close the opening and create the characteristic segments that give the decoration the appearance of a real pumpkin.
What Yarn Should You Use to Make a Crochet Pumpkin?
Medium-weight yarn is ideal for making a crochet pumpkin, especially cotton or a cotton blend. It is important that the stitches are tight enough so that the stuffing does not show through. For a classic version, choose orange yarn, while cream, rust, brown, or mustard yarn can create a more varied autumn decoration.
How Long Does It Take to Make a Small Crochet Pumpkin?
The time required depends on your experience, yarn weight, pumpkin size, and crocheting speed. A small model approximately 7–9 cm high does not require a large amount of work, making it a great project for a short crochet session. A beginner may need more time to control the stitches and shape the pumpkin, while subsequent pumpkins can be made more quickly.
How Do You Stuff and Shape a Crochet Pumpkin?
It is best to add the stuffing gradually in small portions. Distribute it evenly throughout the interior, paying particular attention to the sides. The pumpkin should be springy but not excessively firm. After closing the opening, you can use a needle and stronger thread to gently create several segments running from the center around the decoration. This will give the pumpkin its characteristic rounded shape.
Conclusion
A small crochet pumpkin is a simple project that allows you to create a charming autumn decoration without using a large amount of yarn. All you need is suitable yarn, a crochet hook, stuffing, and a few basic accessories. The key stages are creating the pumpkin body, stuffing it evenly, and forming the characteristic segments.
You can make your finished pumpkin in classic orange or create several versions in shades of beige, brown, rusty red, or mustard. Different sizes and colors allow you to create a cohesive autumn decoration for a table, shelf, or dresser.