Crochet Slippers with a Bow – 7 Simple Tips
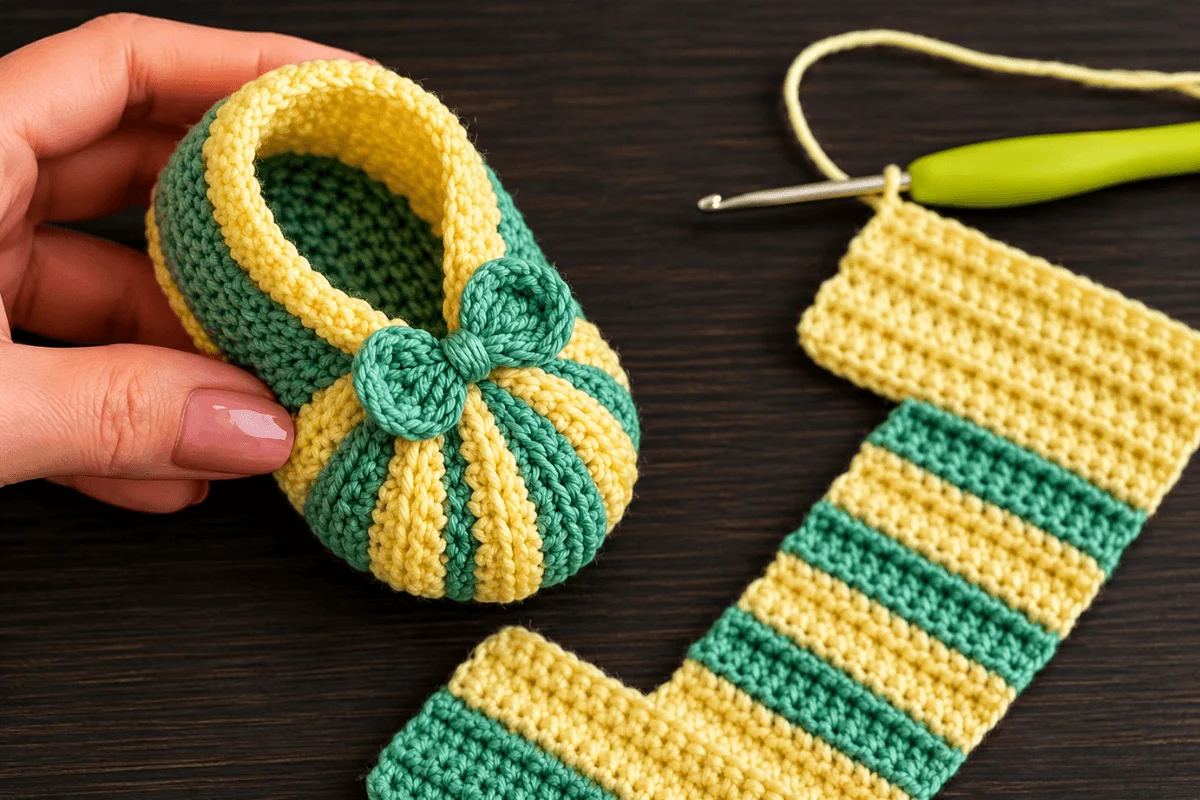
Crochet slippers with a bow are a practical project for making comfortable house shoes with a delicate decorative touch. The combination of green and yellow yarn gives the slippers a bright yet simple look, while the crochet bow adds a charming finishing detail. In this guide, you’ll find tips for choosing the right yarn and crochet hook, making the sole, and adjusting the slippers to fit your foot size. We’ll also show you how to make a crochet bow and securely attach it to the finished slipper.

Crochet Slippers with a Bow – Where to Start?
Crochet slippers with a bow are best started by carefully measuring your foot. The length and width of the sole have the greatest impact on the comfort of the finished slipper. It is also a good idea to decide on the color arrangement and the position of the bow before you begin. This will make the following steps easier and help ensure that both slippers have a similar shape.
How to Plan Your Crochet Slippers
Before you begin crocheting, prepare a measuring tape, yarn, a crochet hook, and a note with your foot measurements. If you want to make the slippers in green and yellow, also decide which color will be the main color.
For a simple design, you can use these approximate measurements:
| Element | Example Measurement |
|---|---|
| Foot length | 24 cm |
| Sole length | 24.5–25 cm |
| Sole width | 9–9.5 cm |
| Side height | 3–5 cm |
| Upper height | 6–8 cm |
| Bow | approx. 7–9 cm wide |
These are only example measurements. When making your own pair, your actual foot measurements are the most important guide.
How to Measure Your Foot Before Starting
Place your foot on a sheet of paper and mark the point at the heel and the point at the end of your longest toe. Then measure the distance between these two points. This gives you the foot length you can use when planning the sole.
You should also measure the width of your foot at its widest point. If you have wider feet, simply increasing the length of the sole will not be enough. You will also need to increase the number of stitches around the rounded sections.
As a general guideline, you can add 0.5–1 cm to the length of your foot. This small amount of extra space helps keep the slippers comfortable without making them too loose.
How to Choose the Length and Width of the Sole
The sole should be slightly longer than your foot. For example, if your foot is 24 cm long, you can plan for a sole measuring approximately 24.5–25 cm.
| Foot Length | Approximate Sole Length |
|---|---|
| 23 cm | 23.5–24 cm |
| 24 cm | 24.5–25 cm |
| 25 cm | 25.5–26 cm |
| 26 cm | 26.5–27 cm |
| 27 cm | 27.5–28 cm |
The width should be adjusted individually. For a foot that is approximately 9 cm wide, you can start with a sole of a similar width and then check the fit as you work.
How Many Chains Should You Make at the Beginning?
There is no single number of chains that works for every size. It depends on the yarn thickness, crochet hook size, and your personal tension.
Start by making a gauge swatch. For example, if you get 20 stitches per 10 cm, that means you have approximately 2 stitches per 1 cm.
You can use this information to estimate the number of stitches needed for your project:
| Gauge | Stitches per 10 cm | Stitches per 1 cm |
|---|---|---|
| Loose | 15 | 1.5 |
| Medium | 20 | 2 |
| Tight | 25 | 2.5 |
However, you should not simply convert the entire foot length directly into the starting chain. The rounded ends of the sole are created with increases, so the foundation chain should be shorter than the total planned sole length.
How to Adjust the Pattern to Your Size
The safest approach is to check the measurements as you work. After completing the first few rounds, place the sole against your foot and check both its length and width.
If the sole is too short, you can add additional stitches or another round. If it is too narrow, increase the number of stitches around the rounded ends. On the other hand, if the edge starts to ripple, you may be making too many increases.
A good solution is to make one test slipper first. After trying it on, you can decide whether you need to adjust the side height, sole width, or shape of the upper section.
Only after checking the first slipper should you make the second one. This makes it much easier to create two slippers with matching dimensions. Adding the green and yellow stripes and the bow will also be much easier afterward.

What Yarn Is Suitable for Crochet Slippers?
Choosing the right yarn is important for both comfort and durability. The yarn should feel pleasant against the skin while also being strong enough to withstand regular use without quickly losing its shape. For this project, a medium-weight yarn is a practical choice because it creates a compact but still soft fabric.
How to Choose the Right Yarn
For slippers, choose yarn intended for practical, frequently used projects. You can use a soft wool blend, wool, or another yarn that can handle regular wear.
Pay particular attention to:
| Property | Why It Matters |
|---|---|
| Softness | Provides comfort while walking |
| Durability | Helps reduce premature wear |
| Stability | Helps the slipper maintain its shape |
| Washability | Makes care easier |
| Yarn weight | Affects stitch count and final size |
If the slippers are going to be worn every day, avoid very delicate yarns that may pill or wear out quickly.
How to Choose the Right Yarn Weight
A medium-weight yarn is a practical choice because it allows you to work the sole and upper section relatively quickly. Very thin yarn requires more stitches, while extremely thick yarn may produce a stiff sole.
As a general guideline, you can use a 3.5–5 mm crochet hook, but the exact hook size should match the yarn and your personal crochet tension.
Make a small swatch before starting. If the stitches are very loose, the sole may be too soft. If the stitches are too tight, the slippers may lack flexibility.
What Crochet Hook Should You Use?
Start with the hook size recommended on the yarn label. You can then adjust it according to the needs of your project.
A fairly dense fabric is useful for the sole. Therefore, if the recommended hook creates stitches that are too loose, you can use a slightly smaller hook.
| Yarn Weight | Approximate Hook Size |
|---|---|
| Thin | 2.5–3.5 mm |
| Medium | 3.5–5 mm |
| Thick | 5–6 mm |
These measurements are only guidelines, so making a gauge swatch is still the best way to determine whether your chosen hook creates the right stitch density.
How Much Yarn Do You Need for One Pair?
The amount of yarn depends on the slipper size, yarn weight, side height, and number of colors. For a simple design, you can prepare approximately 100–150 g of yarn for one pair.
| Size | Approximate Yarn Amount |
|---|---|
| 36–37 | 100–120 g |
| 38–39 | 110–130 g |
| 40–41 | 120–140 g |
| 42–43 | 130–150 g |
If you are making green and yellow stripes, it is a good idea to have a small amount of extra yarn in both colors. This will help you keep the color arrangement identical on both slippers.
How to Combine Green and Yellow
For this project, green and yellow can be used as the main colors. One simple approach is to use one color as the base and the other for several decorative rows.
For example, you could make most of the slipper green and add a yellow stripe around the upper edge. Another option is to alternate several rows of each color.
The important thing is to change colors at the same point on both slippers. This keeps the finished pair looking coordinated.
When changing yarn colors, carefully weave the ends into the inside of the slipper. You can make the bow in a contrasting color so that it stands out clearly against the finished slipper.
How to Make the Sole of Crochet Slippers
The sole is the foundation of the entire slipper, so it deserves special attention. It should be long enough, wide enough, and most importantly, comfortable to walk on. For this design, an elongated oval shape works well because it can easily be adapted to the shape of the foot.
How to Start the Sole with a Foundation Chain
First, make a foundation chain that will form the central section of the sole. Its length should be shorter than the final sole length because both ends will later be rounded with increases.
For example, if the finished sole should be approximately 25 cm long, the starting chain may be around 17–20 cm, depending on the yarn thickness and the number of increases used at the ends.
Do not treat this as a fixed stitch count. Your gauge swatch and actual measurements are more important.
How to Create Rounded Ends
After making the foundation chain, work stitches along one side and then continue along the other side. At both ends, make several increases to create rounded sections around the toe and heel.
A simple planning guide looks like this:
| Section | Purpose |
|---|---|
| Center of foundation chain | Determines the basic length |
| First end | Forms the toe area |
| Second end | Forms the heel area |
| Additional rounds | Increase the sole width |
If the ends look too pointed, you may need more increases. If the edge starts to ripple, you may be adding too many increases.
How to Add Stitches at the Toe and Heel
Make increases mainly around the rounded ends. This allows the central sides to remain relatively straight while the sole gradually develops its final shape.
As you work additional rounds, keep checking the width. You do not need to add stitches everywhere. Once the central section has reached the desired width, keep most of the increases concentrated around the ends.
After each round, the sole should lie as flat as possible. This is a simple way to check whether you are using the right number of increases.
How to Check the Length and Width of the Sole
After completing several rounds, measure the sole in both directions. First, check the total length, then measure the width at its widest point.
For a foot measuring approximately 24 cm:
| Parameter | Approximate Measurement |
|---|---|
| Foot length | 24 cm |
| Sole length | 24.5–25 cm |
| Sole width | approx. 9–9.5 cm |
| Toe allowance | 0.5–1 cm |
If your foot is wider, do not try to achieve the correct fit only by increasing the length. It is better to increase the width while shaping the rounded ends of the sole.
How to Check the Fit
Place the finished sole directly under your foot. The heel should sit close to the back edge, while a small amount of extra space should remain in front of your toes.
Also check both sides. If your foot extends beyond the edge, the sole is too narrow. If there is a lot of extra space around the sides, you can reduce the number of increases.
It is also a good idea to make one test sole before starting the second slipper. Once you have confirmed the correct size, you can use the first one as a guide while making the second.
Once the correct size has been achieved, continue with the next rounds to create the slipper sides. At this stage, you no longer need many increases because the edges should begin to curve gently upward.
How to Crochet Slippers with a Bow Step by Step
Once the sole has reached the correct size, you can begin making the main body of the slipper. At this stage, you will build the sides, shape the upper section, and add the colorful stripes. The key is to shape the slipper gradually so that it comfortably covers the foot without becoming too tight.
How to Make the Slipper Base
After preparing the sole, work the next round around its edge. At this point, avoid making many increases. The goal is for the stitches to begin forming vertical sides rather than continuing to expand the sole.
You can use single crochet, half double crochet, or another stitch depending on the look you want. A denser stitch creates a firmer fabric, while taller stitches create a lighter and more flexible texture.
Try to maintain the same stitch count on both slippers so that they have matching shapes.
How to Move from the Sole to the Sides
After completing the first round around the sole, the following rounds should gradually build the height of the slipper.
Approximate proportions can look like this:
| Element | Approximate Measurement |
|---|---|
| Sole length | 24.5–25 cm |
| Sole width | 9–9.5 cm |
| Side height | 3–5 cm |
| Upper height | 6–8 cm |
You can adjust the side height according to your preference. If you want low, lightweight slippers, a few rounds may be enough. For a more enclosed design, work additional rounds.
How to Shape the Upper Part
The upper section should cover the toes and part of the foot. At this point, you can decrease stitches to gradually narrow the slipper toward the instep.
Do not decrease too quickly. It is better to make small decreases over several rows and check the slipper on your foot after each adjustment.
If the upper section is too wide, you can make additional decreases. If it feels tight around the toes, keep more stitches in the next row.
How to Add Colorful Stripes
Green and yellow can be used to create simple stripes along the sides and upper part of the slipper.
For example:
| Round | Color |
|---|---|
| 1 | Green |
| 2 | Green |
| 3 | Yellow |
| 4 | Yellow |
| 5 | Green |
| 6 | Green |
| Finishing round | Yellow |
This is only an example. You can change the stripe width or use yellow only as a contrasting border.
When changing colors, try to make the transitions as even as possible. Leave the yarn tails long enough to weave them securely into the inside of the slipper later.
How to Finish and Secure the Project
When the upper section has reached the desired shape, work a final finishing round. You can use a simple round of single crochet or slip stitches.
This helps even out the edge and gives the slippers a cleaner, more polished appearance.
At the end, pull the yarn through the final stitch and leave a few centimeters of yarn. Use a yarn needle to weave the end securely between the stitches on the inside of the slipper.
Important: Before attaching the bow, place both slippers together and compare them. They should have similar height, width, and shape. Only then should you move on to making the decorative bow.
FAQ – Crochet Slippers with a Bow
How Do You Crochet Slippers with a Bow Step by Step?
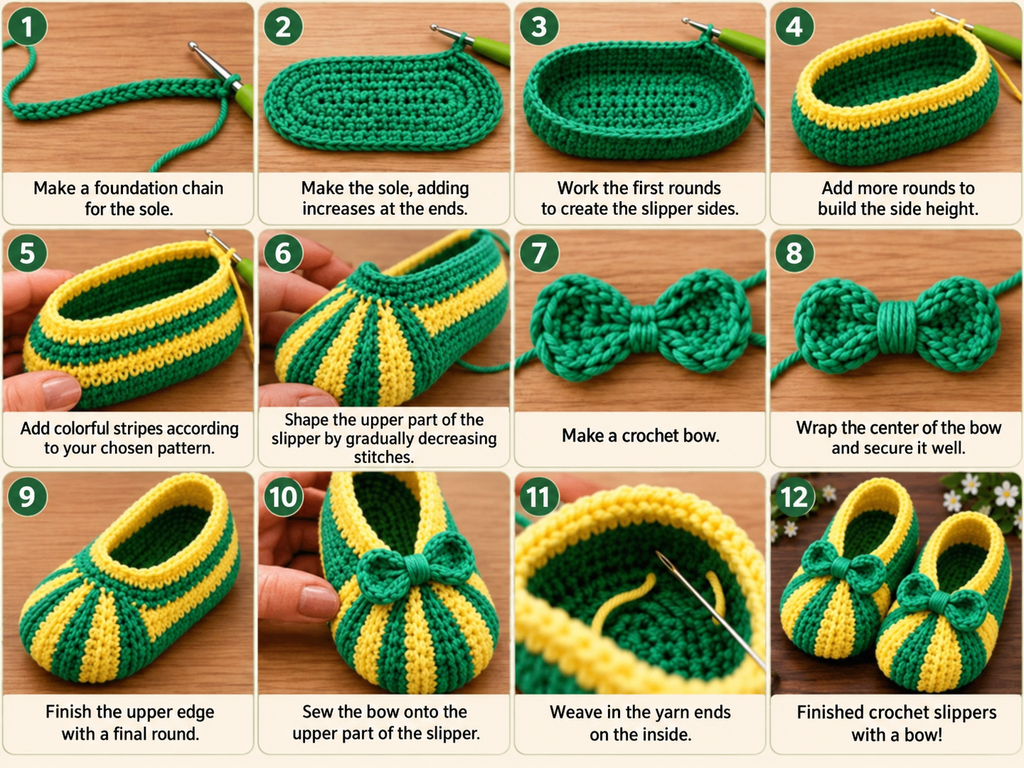
First, prepare a sole that matches the length and width of your foot. Next, work several rounds to create the sides of the slipper, then shape the upper section by gradually decreasing stitches toward the instep. Finally, make a decorative bow and securely attach it to the slipper.
The basic order of the project is:
| Step | What You Do |
|---|---|
| 1 | Measure your foot |
| 2 | Make the sole |
| 3 | Work the rounds that form the sides |
| 4 | Shape the upper section |
| 5 | Add green and yellow stripes |
| 6 | Finish the edge |
| 7 | Make the bow |
| 8 | Sew the bow onto the slipper |
| 9 | Weave in the yarn ends |
For a foot measuring approximately 24 cm, prepare a sole around 24.5–25 cm long to leave a small amount of extra room for comfortable wear.
How Do You Choose the Right Slipper Size?
The best approach is to measure your foot from the furthest point of the heel to the end of your longest toe. Add approximately 0.5–1 cm to the result so the slippers are not too tight.
| Foot Length | Approximate Sole Length |
|---|---|
| 22 cm | 22.5–23 cm |
| 23 cm | 23.5–24 cm |
| 24 cm | 24.5–25 cm |
| 25 cm | 25.5–26 cm |
| 26 cm | 26.5–27 cm |
Width is also important. If you have wider feet, you can add more stitches to the central section of the foundation chain or make additional increases around the sides of the sole.
If the slippers are too tight, do not try to stretch them forcefully. It is better to increase the sole width or length from the beginning of the project.
What Yarn Is Best for Crochet Slippers?
For slippers, choose yarn that is comfortable, durable, and sufficiently flexible. The yarn weight should also match your chosen crochet hook.
| Element | Approximate Value |
|---|---|
| Crochet hook size | 3.5–5 mm |
| Yarn per pair | approx. 100–150 g |
| Main color | Green |
| Secondary color | Yellow |
| Construction | Dense and comfortable |
The yarn should not be too delicate because slippers are exposed to frequent friction. It is also a good idea to make a gauge swatch because different yarns can produce very different stitch densities even when used with the same hook size.
How Do You Crochet a Bow and Attach It to Slippers?
A simple crochet bow can be made from a small rectangular piece of crochet fabric. First, work several rows until you have a rectangle of the desired size. Then pinch the center and wrap it with a narrow strip of yarn.
Suggested dimensions:
| Bow Element | Approximate Measurement |
|---|---|
| Width | 5–7 cm |
| Height | 3–4 cm |
| Center band | 1–1.5 cm |
| Layers | 1 |
The best way to attach the bow is to sew it securely to the upper part of the slipper. Make several strong stitches through the center of the bow and then secure the yarn on the inside.
If the slippers will be used frequently, glue alone may not provide a strong enough attachment. Sewing the bow to the crochet fabric will provide a much more secure finish.
How Do You Make Crochet Slippers Non-Slip?
If the slippers will be worn on smooth floors, consider adding an anti-slip finish to the sole. You can use a suitable non-slip material or a product specifically designed for this purpose.
This will make your finished crochet slippers not only attractive but also more practical for everyday use around the home.
Final Thoughts
Crochet slippers with a bow are a simple and practical project that can easily be customized to your own size and style. The most important steps are measuring your foot accurately, creating a sole with the correct dimensions, and gradually shaping the upper part of the slipper.
The combination of green and yellow yarn gives the project a fresh and decorative look, while the crochet bow adds an eye-catching finishing touch. However, you do not have to stick to these colors. The same design can be made in any color combination that matches your home décor or personal style.
It is also important to pay attention to the finishing details. Weaving in the yarn ends, securely sewing on the bow, and adding an anti-slip treatment to the sole can make the finished slippers more durable and comfortable for everyday wear.
This project is suitable for both beginners and experienced crochet enthusiasts. With a few small changes to the length, width, colors, and decorations, you can create your own customized pair of crochet slippers for yourself or make a thoughtful handmade gift.